How to Apply Peel and Stick Wallpaper
Removable wallpaper is a great way to add a trendy look to your space and an extra dose of personality, without needing to commit. And though installing wallpaper might seem daunting, it’s actually a relatively easy DIY to pull off with the right tools and tips! With our step-by-step guide (complete with expert advice) for how to apply peel and stick wallpaper, this will be an easy upgrade and a renter-friendly hack that will leave your space looking beautiful.
If you’re looking for a simple way to make a big impact, then there’s really nothing better than peel and stick wallpaper. There are so many colors, textures, and patterns to choose from, and it can help bring any room to life—especially if you’re looking for a quick renter-friendly upgrade or a non-permanent way to add a wow factor to your walls. With a spare afternoon and the help of a friend, you can instantly transform your home’s design.
What You’ll Need
- Peel and stick wallpaper, of course!
- Clean cloths
- Isopropyl alcohol or mild dish soap
- Level
- Felt-edge squeegee
- Straight pins
- Utility knife or sharp blade
- Paint primer and paint brush (if walls are dark and wallpaper is light)
How to Install Peel and Stick Wallpaper
1. Pattern-Match Your Panels
Before measuring, determine if your preferred design requires a slight overlap or an edge-to-edge install to pattern-match the panels. This will help you later when you’re trying to line the panels up perfectly.
2. Analyze Your Walls and Examine Your Paint
Test first! Surfaces with any sort of texture—even orange peel—generally aren’t great for hanging peel and stick wallpaper. If your walls aren’t smooth, you’re probably better off with traditional, unpasted wallpaper. Walls primed and painted in eggshell, satin, or semigloss finishes are recommended for easier removal later. “Nonstick” or “scrubbable” paint may repel the adhesive.
If you’re planning to apply peel and stick wallpaper over a dark-colored wall and your wallpaper is light, prime and paint the wall a lighter color before installing so the existing wall color doesn’t show through. Then allow it to fully cure before installing—at least 2 weeks.
3. Prep and Clean Your Walls
Clean the surface with a damp microfiber cloth at least 24 hours before install. Some manufacturers recommend wiping down walls with a 1:1 solution of isopropyl alcohol and water for better adhesion (particularly when walls are painted with zero-VOC paint), but always check the instructions on your specific brand of peel and stick wallpaper first.
4. Use a Level as Your Guide
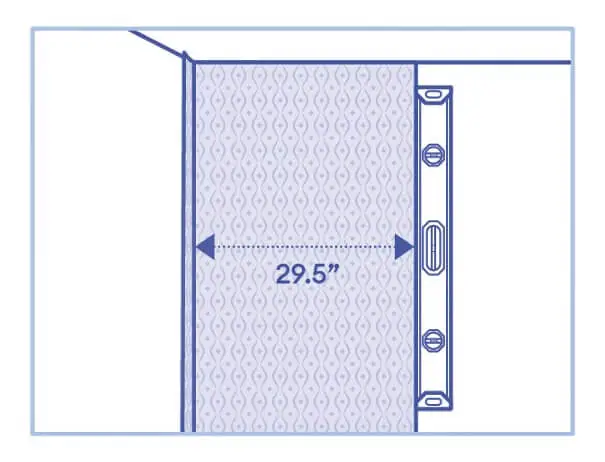
When learning how to apply peel and stick wallpaper, never rely on a corner or your ceiling to be straight, especially if you’re working with stripes or geometrics. To make sure the first panel is perfect, use a level to mark a plumb line 1/2 inch closer to the corner than the width of your wallpaper; use that as your guide, installing from ceiling to floor.
5. Trim Your Panels
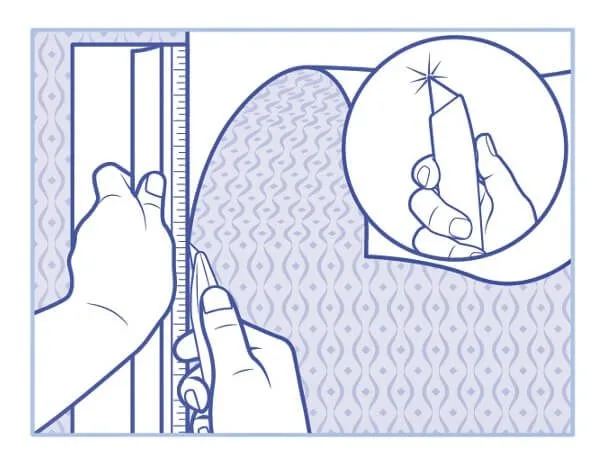
The key to a great trim is a super-sharp blade or utility knife. For best results, replace your utility knife’s blade every two or three cuts. You can trim each panel as you go or all at once at the end, using the straight edge of your smoothing tool as a guide.
6. Get Creative Around Light-Switches
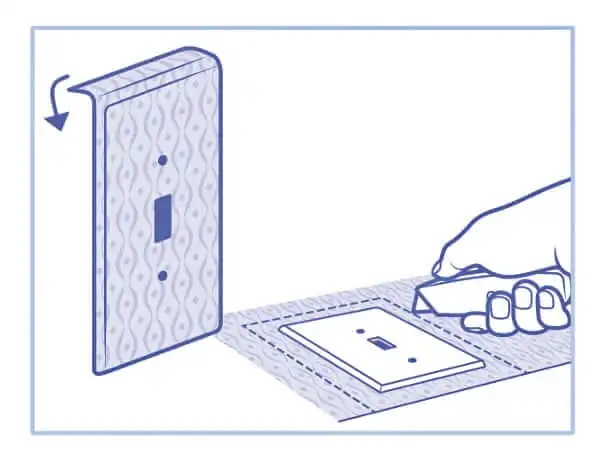
If you want to achieve a seamless look when applying peel and stick wallpaper, install the paper over your light-switch covers. Remove the cover from the wall, cut a piece that matches your pattern, stick it to the cover, trim the edges, then cut out the holes. If the roll is too clunky to manage, rough-cut your panel before installing, factoring in your pattern repeat before cutting panels to avoid falling short.
Peel and Stick Wallpaper Tool Tips and Tricks
- Use the soft side of a felt-edge squeegee to smooth the paper without marring or scratching; the plastic edge guides paper into corners or molding. If it’s not included with your wallpaper, order one online; they’re often used for installing auto decals. (In a pinch, a regular wallpaper smoothing tool or a credit card will work.)
- A straight pin will help to gently pierce stubborn bubbles. After piercing, use the squeegee to help push out the air.
- Enlist the help of a friend! You’ll need someone to help hold the paper in place at the top so you can peel away the backing in small increments (not all at once!). Match up the design as you go, and smooth the paper from the center to the edges.
- Think beyond the wall. With some extra effort, you can learn how to apply peel and stick wallpaper over glass, mirrors, paneling, and ceilings (if smooth and properly prepped), and on stair risers and bookcases for cool effects.
Removing Peel and Stick Wallpaper
A big part of the appeal of removable wallpaper is, well, you can remove it! If you’re ready to do something different, start at a top corner and slowly and steadily peel downward toward the floor. If the wallpaper is being stubborn, hit it with some gentle heat from a hair dryer. If you save the paper backing at install and you’re careful not to stretch the panel during removal, you can even salvage it to reinstall in another spot.
Shop Peel and Stick Wallpaper
By Drew + Jonathan | Illustration by Colin Hayes
Make Your Room Pop With Scott Living Wallpaper
Refresh your walls—and cabinets, bookshelves, and more.
Read More